This article was co-authored with Nathan Smith and Anh Tran.
Machine learning and computer vision can be daunting subjects for developers without direct experience. Our team is looking to leverage ready-made solutions to help developers add machine learning capabilities to their products, without needing to train and understand complex models. In this series, we’re aiming to recognize different gestures made by a user, and display these gestures on an Android device. This project requires accurate tracking and understanding of the hand via a video input, and Google’s MediaPipe looks like an ideal tool to get this working quickly.
MediaPipe Overview
MediaPipe is a framework that offers machine learning solutions primarily involving live detection, segmentation and object tracking through video sources. The framework works on multiple platforms, including Android, iOS, Python, Javascript, and C++. For our project, we’ll be focusing on working off of the Android resources, and will generally use Android Studio for the development of our app. To run and test these apps, we’ll be making use of the Android Debug Bridge (ADB). ADB allows you to communicate with and install APK files onto connected devices and the Android Emulator.
MediaPipe provides a number of out-of-the-box computer vision solutions. One that will be especially useful for our goals is MediaPipe’s Hands solution, which tracks both fingers and hands even while they are self-occluded. For example, while the user is making a fist, the application can still register all of the landmarks of the hand.
MediaPipe can be installed on MacOS, Linux (Debian and Ubuntu), Windows (using the Windows Subsystem for Linux, or WSL), and via a Docker image. While MediaPipe markets itself as an out-of-the-box solution where you can have an example solution running within minutes, we found that the ease of setup varies drastically between platforms. While following the official documentation went pretty seamlessly on MacOS, and running the Hands solution on an Android phone was issue-free, setting everything up on Linux and using the Android Studio Emulator had a number of challenges, as well as setting things up on Windows with WSL. In this article, we’ll review setting up MediaPipe on Linux and Windows machines, as well as on a Docker container.
Setting up MediaPipe on Linux
Before we can use the MediaPipe repository, we need to have Bazel set up on our machine. Bazel is a Google-developed open source tool that is used to test and build projects on multiple different platforms, and supports multiple languages and frameworks. Although you can install Bazel in a variety of ways, we used npm, running the following command in our terminal:
npm install -g @bazel/bazelisk
This installs Bazel via Bazelisk, a wrapper that automatically picks a proper version of Bazel to install on your device. Once this is installed, we can clone the MediaPipe repository. This repository holds all the example solutions that developers can leverage, including face detection and hand tracking. Now we will need to set up OpenCV and FFmpeg. OpenCV is an open source computer vision and machine learning software library containing thousands of algorithms, which will be necessary for the 3D tracking that is used in many of the Mediapipe solutions. FFmpeg is a solution for converting and streaming audio and video on multiple platforms.
The version of OpenCV we will be using will depend on the version of Debian/Ubuntu we are using. We are on Ubuntu 22.04 and are using OpenCV 4, and thus will need to make the following changes to the opencv_linux.BUILD file in the /mediapipe/third_party/ directory.
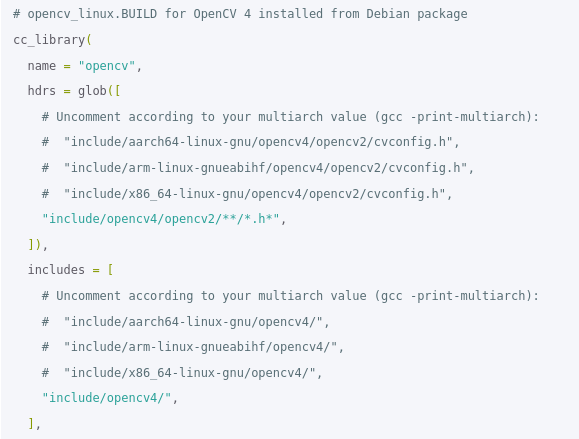
Running gcc -print-multiarch in our terminal yields x86_64-linux-gnu. Thus, we update this file by uncommenting the “include/x86_64-linux-gnu” lines. There are other methods of setting up OpenCV on the official documentation for MediaPipe installation on their webpage, however, we did not go over those as they are more tedious than the previous method and not necessary for our goals. Now, to make sure we’ve properly installed and set up MediaPipe and Bazel, we run the following commands:
export GLOG_logtostderr=1
bazel run --copt -DMESA_EGL_NO_X11_HEADERS --copt -DEGL_NO_X11 \
mediapipe/examples/desktop/hello_world:hello_world
This prints Hello World! 10 times within our terminal.
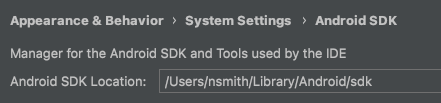
During the course of testing out different MediaPipe solutions, we primarily used Android Studio, which was a new development environment for us. Thankfully, Android Studio has a very straightforward user interface, which provided by far the easiest way for setting up our Android SDK (Software Development Kit, a set of tools for developing and building Android applications) and Android NDK (Native Development Kit, allowing you to use C and C++ code with Android). In order to set these up, all we had to do was use Android Studio’s SDK tools menu to install the required APIs.
In order to actually build and run the solutions provided by MediaPipe, it is necessary that you set an ANDROID_HOME & ANDROID_NDK_HOME environment variable. Ubuntu makes use of a .bashrc file where variables can be manually and permanently set. Inside this .bashrc file, we added:
export ANDROID_HOME="/path/to/Android/Sdk"
export ANDROID_NDK_HOME="path/to/Android/Sdk/ndk/21.4.7075529"
The path to your Android SDK & NDK can be a bit annoying to find, however, Android Studio makes the whole process easier. All we had to do was navigate to the SDK tools menu and right at the top, the path to the SDK is listed, and inside the SDK path is the NDK.
Now, all that’s left is to build and run the ML solution/app. Thus far, we haven’t manually implemented all the necessary components for the application and will be using one of the provided examples that came with the cloned repository. To build the android “Hello World” application, all we had to do was navigate to the application directory and run the following command:
bazel build -c opt --config=android_arm64 :helloworld
Once the application is successfully built, you should find a folder in the following directory:
/mediapipe/bazel-bin/mediapipe/examples/android/src/java/com/google/mediapipe/apps
We navigate into the folder and find an apk file that contains the name of the application which will be used to install the built app. Now, typically developers will download their apk file by just dragging and dropping the apk file onto the screen of their running virtual device, however that is a bit clunky, and oftentimes non-descriptive errors can result from this assuming something went wrong. The best way we found of installing this was through the use of the Android Debug Bridge (ADB).
All that had to be done was to create and run a virtual device in Android Studio, and then run the emulator. Once the virtual device is running, we were able to see the device listed through running adb devices. We could then navigate into the apk file’s directory and run adb install <filename>.apk, or helloworld.apk in our case, to install the app onto the running devices. The app could then be run on the device without a problem.
Challenges setting up MediaPipe on Windows/WSL
We found that we could not reasonably set up MediaPipe on Windows or WSL in a reasonable timeframe, due to issues that would come up during the process. For the Windows setup, the primary issue was that MediaPipe on Windows was still in an experimental phase, and as of the publication of this article, it is yet to be possible to build MediaPipe Android apps on native Windows. This fact would lead us to attempt to set MediaPipe up on WSL.
Regarding WSL, we were able to set it up to the point that the Hello World application was able to build and run. However, when it came to attempting to build the Android apps, there were repeated issues working between MediaPipe and the Android SDK. Ultimately, we felt that it would take too long to try and diagnose the specific issues, and thus we pivoted to the Docker solution.
Setting up MediaPipe via Docker
The prerequisites for setting up MediaPipe in a Docker container are setting up WSL2 for Docker integration, then installing Docker Desktop. WSL2 integration with Docker allows us to run Linux containers through Docker, which helps us bypass the issues we previously ran into on Windows. Once Docker is installed, proceed to clone the MediaPipe repo to your machine and move into it, then build a docker image with tag “mediapipe”.
git clone https://github.com/google/mediapipe.git
cd mediapipe
docker build --tag=mediapipe .
Next, proceed to create the container with the docker run command. This command creates the container, then starts it.
docker run -it --name mediapipe mediapipe:latest
The first time you run this, you should end up in a Bash terminal within the container. If this is not the first time, and you are starting from an exited container, use the following commands to enter the container:
docker start mediapipe
docker exec -it mediapipe /bin/bash
Once you are inside the container, attempt to run the Hello World example to verify success.
root@bca08b91ff63:/mediapipe# GLOG_logtostderr=1 bazel run --define MEDIAPIPE_DISABLE_GPU=1 mediapipe/examples/desktop/hello_world
Then, to set up for building Android apps, run setup_android_sdk_and_ndk.sh from inside /mediapipe. This command will automatically download and set up Android SDK and NDK, as an alternative to setting them up via Android Studio.
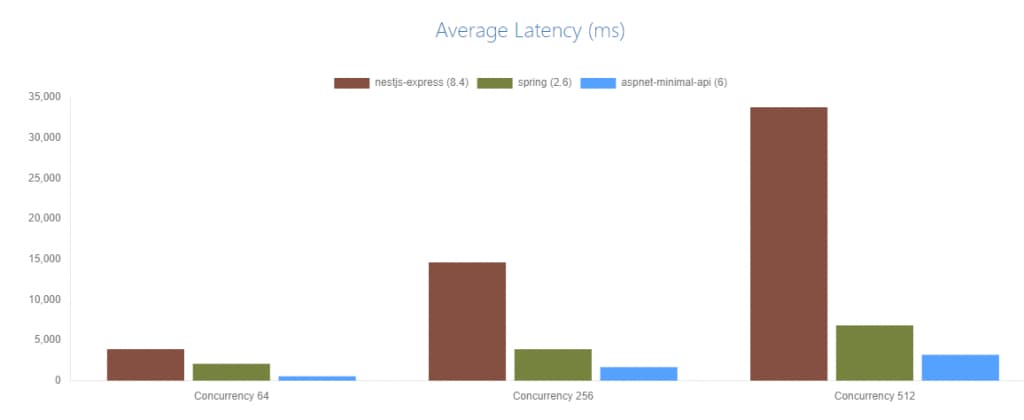
Building the app once you have everything set up is fairly straightforward. For example, to build the hand tracking demo, run the following command:
bazel build -c opt --config=android_arm64 mediapipe/examples/android/src/java/com/google/mediapipe/apps/handtrackinggpu:handtrackinggpu
This can take quite a while depending on your machine, so patience will be necessary. Completion should look something like this:
Once you are done building the app, the next step would be to install the app onto your device.
The recommended way to do this would be to install the app via adb. However, there were issues with connecting my phone to the container over adb due to home network issues that could not be resolved, so an alternative solution was pursued.
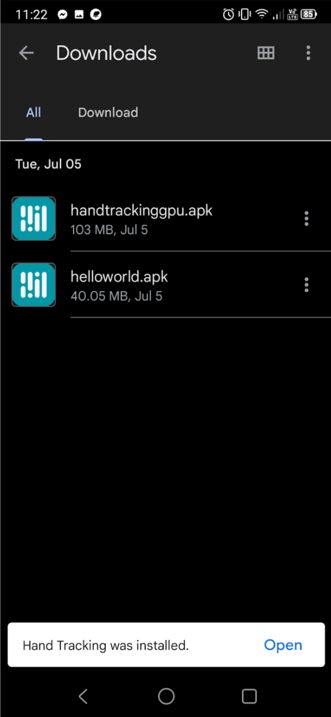
The alternative solution that I used to install the app is fairly simple. What I did was copy the apk file to my host machine, then dropped it into my Android device’s storage. From there, I installed it directly from my device. To copy the apk file from the docker container, use the following command from your host machine:
docker cp <containerId>:<filePathWithinContainer> <hostPathTarget>
An example of this command would be:
docker cp example_container:/example_file.apk .
Then, place the apk file into your device and install it from your device. In this example, I placed the handtrackinggpu.apk into my downloads folder.
The MediaPipe Hands Project
Real-time hand tracking anywhere, anytime. That is what MediaPipe provides its users. While many state-of-the-art solutions for this employ powerful desktop environments, MediaPipe is able to achieve this on mobile devices. This allows us to employ the technology in a wide range of applications that would otherwise be hampered by the requirement of a powerful machine.
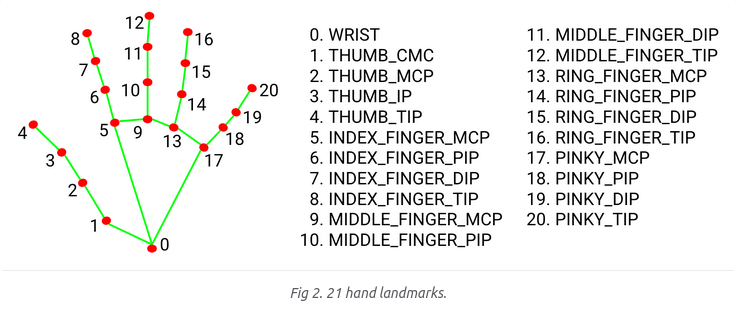
MediaPipe accomplishes this by using an ML pipeline that consists of multiple models working together. A palm detection model operates on the entire image and returns a cropped image defined by an oriented hand bounding box. A hand landmark model operates on this cropped image and returns high-fidelity 3D hand landmarks. By utilizing the cropped hand image for the hand landmark model, MediaPipe is able to significantly reduce data augmentation, and is able to dedicate most of its processing capacity towards accurately predicting the coordinates of the key points. Later crops can also be generated based on hand landmarks previously identified, and only when the landmarks can no longer be identified does the palm detection get invoked again. A breakdown of the mapped landmarks is as follows:
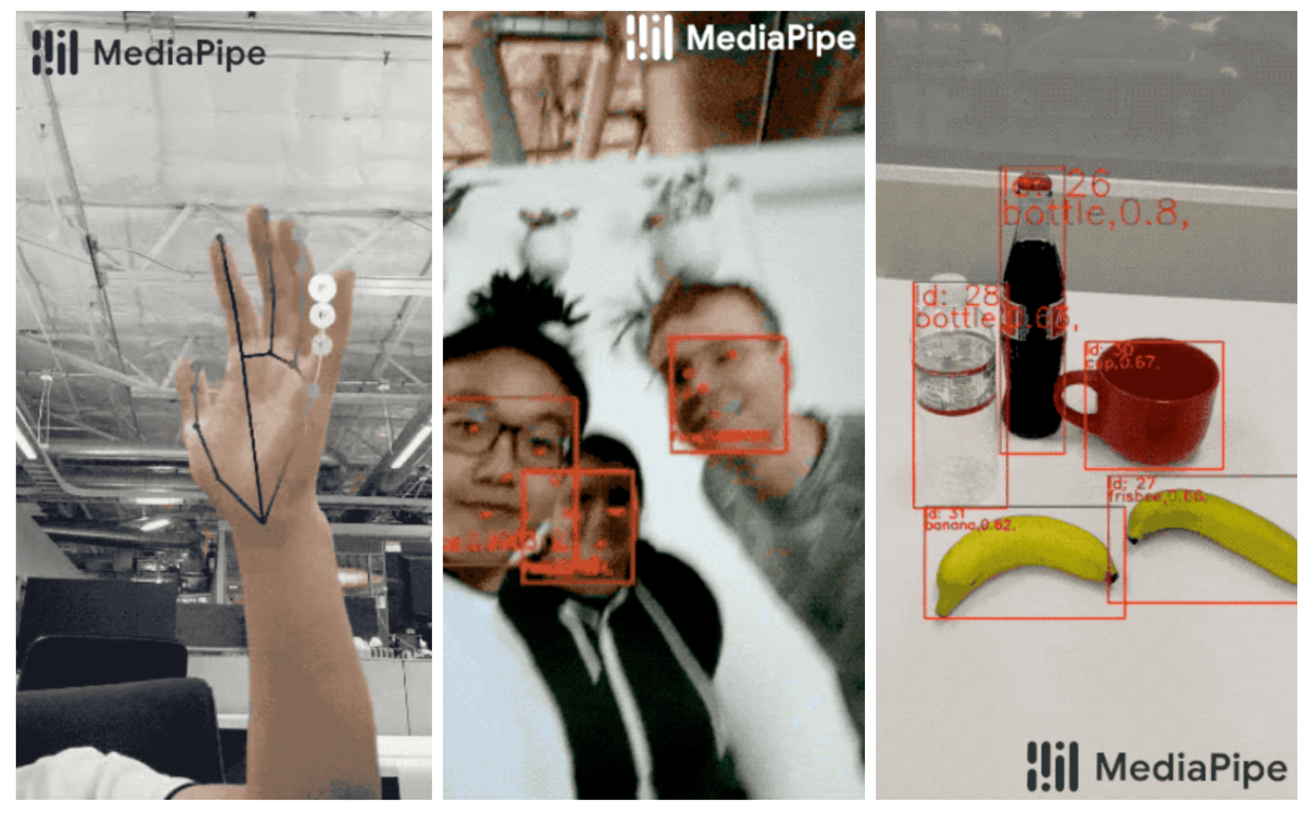
Images by MediaPipe via MediaPipe
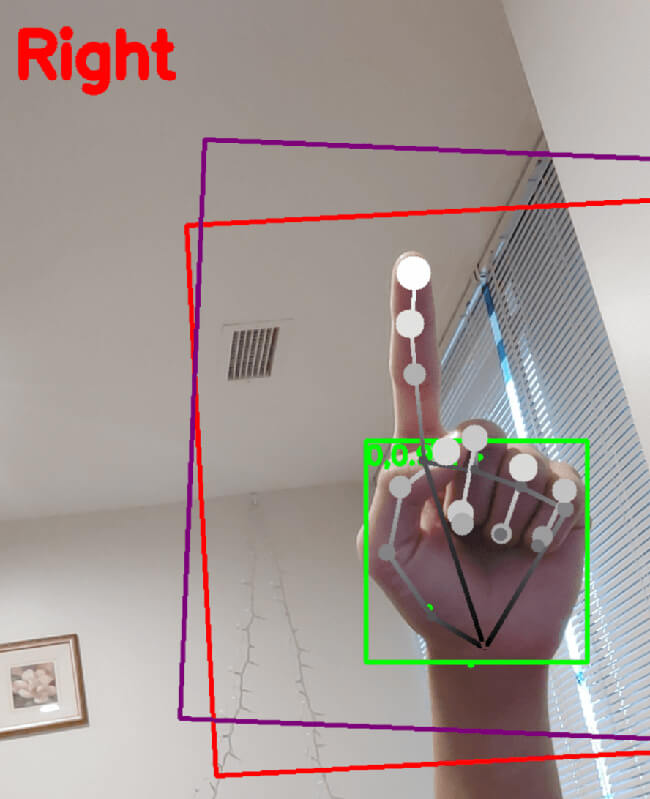
Hypothetically, we could use the hand landmarks to trigger events in an application. For example, if landmark 8, at the tip of the index finger, is within a certain frame on the screen for some period of time, we could interpret that as the user selecting an option in an interface. Here’s an example of MediaPipe’s default overlay for a pointing hand:
By leveraging MediaPipe’s clear and accurate understanding of different points of the hand relative to one another, and training it with examples of different gestures, we can develop a live gesture recognition application. We’ll need a labeled dataset of hands in different configurations and their specific gestures, such as pointing, a peace sign, a fist, and more. We could then leverage a machine learning solution such as TensorFlow to predict a hand gesture, with the location of our hand landmarks as the input.
Conclusion
Despite some issues setting it up across Linux and Windows devices, MediaPipe provides an impressive array of computer vision solutions that can be set up quite easily without any machine learning knowledge. The Hands solution provides a shockingly accurate estimation of many landmarks on the hand, providing a wealth of possibilities for recognizing both stationary gestures, such as pointing, in addition to motion gestures such as waving and swiping. In the next article in this series, we’ll be exploring how to develop an Android app that displays live estimations of a user’s hand gestures in the UI, and think forward to how these features could be employed in a real-world solution, such as a touchless kiosk for ordering food.

About Mission Data
We’re designers, engineers, and strategists building innovative digital products that transform the way companies do business. Learn more: https://www.missiondata.com.